The query builder allows the building of bespoke queries of the data in the database. The returned output for any query will only contain data from samples listed in the Sample List in the left menu. Be careful that you have all the Samples needed present in the Sample List before building the query. If necessary Clear current Search, Include Publications or Exclude Migrant dialects before building the query.


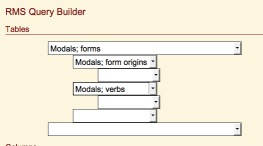
When the layout is first loaded there is a single select box under 'tables'. This lists all the 'tables' that are related to the 'Samples' table. The 'Samples' table is selected by default within the system. Selecting a table from this list will present another select box underneath and slightly indented.
This new select box lists only tables that are related to the selected table. Selecting a table from this list will present another select box beneath and slightly indented again, this lists all the tables that are related to the newly selected table, and so on.
Selecting tables in this way allows a complex 'tree' structure to be built up of tables. Any number of tables can be selected, building as 'wide' or as 'deep' a tree structure as is desired. However, the deeper the 'tree' the less meaningful the relationships between the branch nodes becomes (much like in a family tree). In most cases a 'tree' of no more that three nodes deep is more than sufficient. Almost any 'tree' that is deeper than this can, and should, be re-considered and built using a different 'root' node, thus providing a slightly different perspective on the data and reducing the depth.


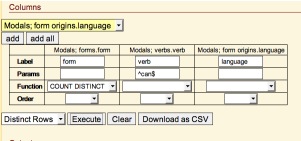
Below the table selection there is a section labeled 'Columns'. Here is a select box that initially is empty, however, as tables are selected it fills up with the names of the columns from the selected tables. These names are prefixed with the name of the table that they come from.
Once all the tables have been selected the columns can be selected from the list. Select a column from the list and then click on the 'Add' button. This will add the column to the table below. Clicking on the 'Add All' button will cause ALL the columns in the list to be added.
After selecting the required tables the parameters for the query can be defined. There are four parameters that can be defined.
Label : This is the name (or label) for the column in the output table. Only columns with a defined label will appear in the output table. This defaults to the name of the column from the sources table. Where more than one column in the source tables have the same name a numerical index is added in order to make it unique. NOTE: All labels must be unique.
Params : This is a regular expression that tells the system to only select rows where the value for the specific column matches the regular expression entered here.
Function : There are two options currently avialable; 'COUNT DISTINCT' and 'COUNT'. These cause the column to present a count of the values for that column that have the same values in the other columns. 'COUNT' will count all values; 'COUNT DISTINCT' will only count unique values.
Order : There are two options; 'ASC' and 'DESC' ('ascending' and 'descending' respectively). These options cause the table to be orderd in the selected manner based on the values of the orderd column. Where more than one column has an order selected precedence is given to the column to the left in the output table.
Below this table are four more controls. These controls are to do with the actual execution of the query.
The first control tells the system whether to display 'All rows' or only 'Distinct rows' (rows that are unique, where two or more rows have exactly the same values in each and every column then only one row will be presented). This is a very significant function and one must be careful to use the correct selection here in order to make sure that the query is asking the intended question of the data.
The 'Execute' button actually performs the defined query. Once clicked the output table will be populated with the relevant data. This could take a few seconds depending upon the complexity of the query that has been built and the amount of data that is being returned.
The 'Clear' button will remove all data from the output table.
The 'Download as CSV' button will cause the query to be executed but the output table will not be populated with data, instead the data will be compiled into a UTF-8 encoded CSV file that the browser will be prompted to download. This CSV can be viewed in any UTF-8 compatable text editor or spreadsheet package.

Here we can see the result of the query once the 'Execute' button has been clicked. Depending upon the amount of data, the complexity of the query, your internet connection speed and how busy the system is at the time there could be a delay of a few seconds before the table is presented or updated.
This table can be copied into any spreadsheet or wordprocessor software using a simple copy and paste.